I first discovered the Discworld books when I was probably in my preteens, when my older brother left ‘Mort’ on the kitchen table and I was in need of something to read. I picked it up not really expecting much, and then spent the rest of the summer hungrily hunting down other books from the series. And I’ve been pretty much addicted ever since. My favourite books are the Watch books – there’s something about Sam Vimes, Captain Carrot and Sergeant Angua that really just grabs me. I don’t have a favourite book, I find it impossible to pick one. But when I have nothing to read, or when I don’t feel well, or when I just really fancy phasing out and losing myself in another world it’s always Discworld that I return to.
So when Terry Pratchett died back in March, I knew I needed – not wanted, needed – to pay tribute somehow. And I’ve finished in time to tie in nicely with the release of the final (sob) Discworld book ‘The Shepherd’s Crown‘ next month, so consider this free pattern my prerelease gift to you, in memory of a man whose creativity and writing genius far outstrips anyone else ever. You’re missed Sir Terry- RIP.
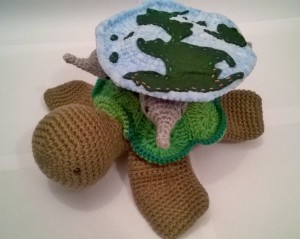
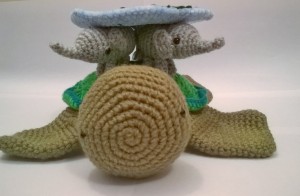
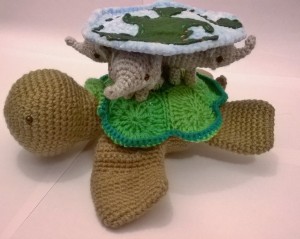
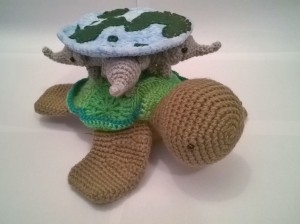
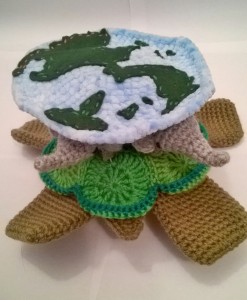
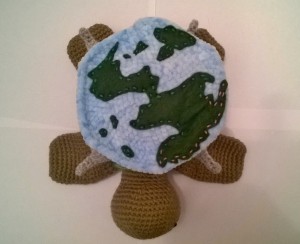
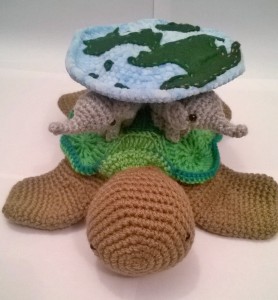
I present: The Discworld.
The turtle, Great A’tuin, and the disc itself are my patterns, and the four elephants, Tubul, Jerakeen, Berilia and Great T’Phon, are made using Mad Crochet Lab’s Elephant pattern which you can buy for just $2 at the link. Patterns for my parts are available free after the jump.
The Essentials:
Hook: 3.5mm
Yarn: Great A’tuin – Dark green worsted weight for body (Although Double Knit would also work but will give a smaller result), three shades of brighter green Double Knit for the shell. Elephants – Grey Double Knit. Disc – pale blue (I used a fuzzy chunky wool in a worsted weight kinda size, but again normal worsted weight or double knit would do – just make it same as the belly weight wise I suppose)
Also needed: Five sets of 6mm safety eyes; green felt; green and brown embroidery thread.
Finished Size: approx 10” long, 8″ wide and 6″ tall
Terms (US Terminology):
CH = Chain
Sc = Single Crochet
Tc = Treble Crochet
INC = Increase
DEC = Decrease
SL ST = Slip Stitch
FO = Finish Off
Great A’tuin
Belly
Magic Ring in body colour
Round 1: 6sc into centre of magic ring [6]
Round 2: INC around [12]
Round 3: {1sc, INC} repeat around [18]
Round 4: {2sc, INC} repeat around [24]
Round 5: {3sc, INC} repeat around [30]
Round 6: {4sc, INC} repeat around [36]
Round 7: {5sc, INC} repeat around [42]
Round 8: {6sc, INC} repeat around [48]
Round 9: {7sc, INC} repeat around [54]
Round 10: {8sc, INC} repeat around [60]
Round 11: {9sc, INC} repeat around [66]
Round 12: {10sc, INC} repeat around [72]
Round 13: {11sc, INC} repeat around [78]
Round 14: {12sc, INC} repeat around [84]
Round 15: {13sc, INC} repeat around [90]
FO leaving a long tail for sewing.
Side note – I started crocheting this sat by a gorgeous pool in sun-baked Tunisia. I finished it sat by my laptop in the gorgeous rain soaked England…
Shell
Make one in green shade A, and three in green shades B and C.
Magic Ring.
Ch 3
Round 1: 11Tc into centre of magic ring [12 including initial chain] Join round using a SL ST
Round 2: Ch3, 2Tc into gap between first Tc of Round 1. *3Tc into next gap* Repeat * to * ten times [36]
SL ST to join, then FO leaving a long tail for sewing.
Sew your circles together through six stitches in each. Colour A should be in the centre, then alternate the B and C colours around. Sew the outside circles to the centre first, then sew them together through six stitches up the side. Sorry if that is totally unclear – let me know if I need to make a diagram!
Once they’re all sewn together, Sc around the edge with Colour A. There should be 108 stitches (18 per circle).
Attaching shell to belly
Using the tail from the belly, sew on five of the circles, leaving one open to attach the head. If you think of the belly as having five edges each 15 stitches long, it’s easier to work out how to attach it – fifteen stitches per circle. Leave a slight lip to each circle to add realism.

Stuff firmly.
Head
Magic Ring in body colour
Round 1: 6sc into centre of magic ring [6]
Round 2: INC around [12]
Round 3: {1sc, INC} repeat around [18]
Round 4: {2sc, INC} repeat around [24]
Round 5: {3sc, INC} repeat around [30]
Round 6: {4sc, INC} repeat around [36]
Round 7: {5sc, INC} repeat around [42]
Round 8: {6sc, INC} repeat around [48]
Round 9-12: Sc around [48]
Round 13: {6sc, DEC} repeat around [42]
Round 14: {5sc, DEC} repeat around [36]
Round 15: {4sc, DEC} repeat around [30]
Round 16: {3sc, DEC} repeat around [24]
Round 17: {3sc, INC} repeat around [30]
Round 18-20: Sc around [30]
SL ST to join the round then FO leaving a long tail for sewing.
Add safety eyes between rounds 7 and 8.
Stuff firmly.
Attach the head to the body where the hole was left by not sewing the sixth circle – fifteen stitches to the belly, and fifteen through the circle.
Tail
Ch9 in body colour.
Row 1: Sc 8. Ch1 and turn.
Row 2: Dec, Sc4, Dec. Ch1 and turn.
Row 3: Dec, Sc2, Dec. Ch1 and turn.
Row 4: Dec, Dec. Ch1 and turn.
Row 5: Dec. FO leaving long tail for sewing.
Sew the tail in place at the back of the body.
Front Flipper
Ch10 in body colour.
Round 1: Sc around the chain [18 – 9 per side]
Round 2: {2sc, INC} repeat around [24]
Round 3-7: Sc around [24]
Round 8: 20 Sc STOP CH1 and turn.
Round 9: 16 Sc STOP CH1 and turn.
Round 10: 12 Sc STOP CH1 and turn.
Round 11: 8 Sc STOP CH1 and turn.
At the minute you’ll have something that looks like this:
Continue crocheting in full rounds from here:
Round 12: Sc around [24]
You will need to go from step to step to flatten them down (this will make more sense when you’re actually crocheting, I promise – just ignore the raise and work into the next stitch). You’ll end up with the piece now looking like this:
Ta-da! Flattened!
Round 13-14: Sc around [24]
Round 15: 12 Sc STOP CH1 and turn.
Round 16: 16 Sc STOP CH1 and turn.
Round 17: 12 Sc STOP CH1 and turn.
Round 18: 8 Sc STOP CH1 and turn.
Continue crocheting in full rounds from here:
Round 19: Sc around [24]
Again, you will need to go from step to step to flatten them down.
Round 20-21: Sc around [24]
FO leaving a long tail for sewing.
You should end up with a flat curved shape:
Sew the front flippers in place next to the head. They should curve towards the back.
Back Flippers
Ch10 in body colour.
Round 1: Sc around the chain [18 – 9 per side]
Round 2: {2sc, INC} repeat around [24]
Round 3-12: Sc around [24]
FO leaving a long tail for sewing.
Sew these in place either side of the tail.
And that’s Great A’tuin finished!
Phew. That’s the long bit over with. Oh except you now need to make four of these:
Elephants (make four)
Now the observant among you will notice that A) My laptop changed colour, and B) that elephant is waaaay fluffier than the ones used on my Discworld. I apparently got so excited that I finally finished all four elephants that I forgot to photograph them. Oops. Luckily, this one is a version I made about a year back as a tester for the original Mad Crochet Lab Memory Experiment that the Elephant pattern comes from. How cute is it?! I didn’t feel the need to make my own pattern when this adorably perfect one was already out there from a fellow crocheter. Go buy the Elephant pattern from Mad Crochet Lab and make four of them ok? (It’s three patterns in one – elephant, mammoth and gnome!).
Discworld
The Discworld is probably the easiest part of this entire, well, Discworld.
Magic Ring in blue
Round 1: 6sc into centre of magic ring [6]
Round 2: INC around [12]
Round 3: {1sc, INC} repeat around [18]
Round 4: {2sc, INC} repeat around [24]
Round 5: {3sc, INC} repeat around [30]
Round 6: {4sc, INC} repeat around [36]
Round 7: {5sc, INC} repeat around [42]
Round 8: {6sc, INC} repeat around [48]
Round 9: {7sc, INC} repeat around [54]
Round 10: {8sc, INC} repeat around [60]
Round 11: {9sc, INC} repeat around [66]
Round 12: {10sc, INC} repeat around [72]
Round 13: {11sc, INC} repeat around [78]
Round 14: {12sc, INC} repeat around [84]
Round 15: {13sc, INC} repeat around [90]
FO and weave in the ends.
Side note the second – how gorgeous is this yarn?! It’s super fluffy, and soft, and I want to make a polar bear from it for snuggling purposes.
Block your Discworld in whatever way you prefer (I just ironed mine cos I’m impatient, but you can go the whole spray starch and water and pin out route if you find it works better).
Now to the applique! Cut the shape of the Discworld landmasses from green felt. I used this image as inspiration:

I think it says drawn by Gary Tonateu but I can’t quite make it out – please let me know who to credit if you know! It’s definitely a simplification of Paul Kidby’s design.
Here’s my version:
The brown stitching is coast line. I was going to use white stitching for mountains but I didn’t think of it early enough and I didn’t want to ruin it. Go nuts with yours though.
The felt will also help your Discworld stay flat too – bonus for us lazy blockers!
Ok, now that you have all the elements – turtle, four elephants and a curiously 2D planet – it’s time to construct.
Making the Discworld
Ok, if you have access to one, make life easy on yourself and use a glue gun. I am out of glue for mine and couldn’t find any to buy locally, so I stitched it. It’s simple enough but the fiddliness makes it still just enough of a pain whereas a glue gun would be super easy!
Firstly, sew or glue your elephants on to the back of Great A’tuin. It’s easiest to start by securing the back legs of all four first, and then securing the front legs of all four – this helps you make sure all your elephants are in the right place before it’s too late (maybe pin them first if you’re going to glue, just in case!).
It will look like your elephants are about to take a nose dive off the shell, so secure their butts together and pull them back upright:
You won’t see this when you’ve added the Disc so don’t worry that it looks a bit messy.
Finally, place your Disc on top of the elephants and secure.
And there you have it! Enjoy a million photos of the Discworld!



Ruthi, you are an awesome designer and an amazing woman !! Thank you so much for this fantabulous tribute to the great genius STP ❤
The Turtle Moves.
Gnu TerryPratchett
Ellen, coming from you that means more than anything 😀
GNU Terry Pratchett x
I love this cute creation, Ruthi! It’s stunning, you did an amazing job! ❤
Thank you Duddles! 😀 x
Oh that’s lovely! And now Rincewind’s hat and The Luggage please!! x
I have always had The Luggage at the back of my mind as a project! All those legs though 😉 x
What talent you have. I hope that by doing elephant art the species will be saved. What do you think? http://www.segmation.com
How beautiful would that be?! Activism through yarn 🙂 x
Thanks for posting this! The turtle moves!
The Turtle Moves.
GNU Terry Pratchett x
‘Outstanding Creation …… Deffo gets a great big OOK from me’ xxxxx
*Hands over banana* 😀 Thank you! x
I do believe that Sir TP, through his books, shall always be my personal shrink 🙂 What a wonderful tribute!
There’s just no psychologist out there that would ever reach the same results 🙂 Thanks x
Well, good gracious! I was just away for a six night camping vacation and came back to a number of requests for the elephant pattern and wondered why! Now it all makes sense! It would appear your disc world is a hot item and I couldn’t be more pleased that you used my pattern to help create it! Thank you so very much, Ruth! I adore what you have created and will be sharing it on my pages! xoxo
Glad people are getting it from you – together we shall over run the world with yarny Discworlds! 😀 Thanks so much for the shares too xx
Actually, I would like to share direct from my blog to yours so I am going to steal one of your photos and link to you here. Please let me know if that is not okay and I will take it down. But I will credit you for the work and the photo as well as the link so I will assume that it is okay unless I hear otherwise from you. 🙂
Absolutely totally fine and a honor 😀 x
Fabulous! Amazing and I love that you brought Discworld to Life (or maybe to yarn…)
Love Discworld too x
Yarn is life for crocheters sooo…. 😉 x
Also the elephant pattern makes a nice Elephant Shrew https://www.flickr.com/photos/nationalzoo/14212676870 or Fingermouse https://s-media-cache-ak0.pinimg.com/736x/8b/a6/21/8ba6215a6dd2e2cbf412b006511b7165.jpg
I was hooked from The Color of Magic and the moment when Twoflower introduced (badly) the idea of insurance….
Ha it totally would make those so well! 😀 x
Just been sent the link to your site and this wonderful post by a friend who is following my Discworld Marathon in tribute to Sir TP. This is amazing! I only wish I could Crochet! A wonderful tribute to an amazing man. I hope you don’t mind but I’ve shared your site and this project on my blog: http://thelittlelandofme.blogspot.co.uk/2015/08/why-cant-i-crochet.html
Thank you! Share away, it’s a great write up 🙂
I totally recommend Planet June and Nerdigurumi on YouTube if you wanna learn to crochet btw x
Pingback: In which Amiguruthi remembers a great man. | Outside of Amiguruthi
I started reading The Shepherd’s Crown with a heavy heart last week and while I would normally devour Discworld in days, I am hurting too much to read for long periods. Like you, I knew I needed to do something, but I am not a designer. This is so perfect. Thank you!
😀
I had to read TSC as quickly as possible (like tearing off a band aid!). I was very upset by chapter 2! Now that I’ve finished I’ve gone back to Colour of Magic to reread all the series cos I don’t want to accept it’s over 😦 x
I was crying by page 38! I rage quit the book.
I do find it nice now *spoiler alert* GW’s first book was about a girl wanting to be a wizard and now in her last (at least where I have got to) there is a boy who wants to be a witch.
Also, I’m too far gone for the answer to help but when you say Trebles did you mean US or UK trebles? I guessed US by the use of SC over DC but I think my shell came out too big. Useable but it was confusing.
I nearly rage quit too! Yes though I do love the gender role reversal and how well it mirrors Equal Rights 🙂
The trebles is meant to be US terminology yes – It should be wrap the yarn twice round the hook before your go into the stitch and yarn over. That is a treble right? I do get confused between my DC and TC! x
Thank you, Ruthi. Sir Terry died on my birthday and I’ve been hunting for something to do to honor him for the upcoming anniversary. This will be my comfort gift to myself.
GNU Sir Terry Pratchett. De chelonian mobile.
Wow what horrible birthday present! Great to hear that you wanna make one in honor though – The turtle moves! x
Pingback: Inspiration Friday: My Favourite Things – My Yarntastic Adventures
Thank you so much for this pattern! I’ve made one to give as a gift to one of my dearest friends who has looked after me through university, and I was looking for something to make to say thank you. Terry Pratchett is a joint favourite, and so this was the perfect thing! I’m also going to have to make one for myself, because I’ve fallen in love with how cute it is!
What a lovely reason to make one! I hope they liked it 😁 And to undertake it twice is real love lol x
Oh gosh I hope this gets read. I absolutely love this design and really want to make it for my partner for their birthday (which is in October). The Discworld series is pretty special and close to our hearts and I can’t wait to make this!
My only qualm is that I am a knitter.. I’ve tried to crotchet a couple of times and just haven’t gotten the hang of it. Any tips or recommendations? Also how many skeins of yarn are needed for this project exactly? I could have missed it and I’m sorry if I did.
Many thanks! X
Hi Alexandra!
I would recommend watching Planet June’s crochet tutorials on You Tube. She really helped me when I was learning to crochet. It’s easy once you get the hang of it I promise! The turtle belly is a good place to start because it’s very basic and big enough to hide any dodgy stitches lol.
As for the skein amount, I’m honestly not sure is it all came from my stash. Definitely less than one of each colour though.
I hope that helps. Good luck with your learning and I am sure your partner will love this.
Amiguruthi x
Hi, I’ve just made the turtle but it says the elephant pattern os unavailable, can u help?